cPanel and WHM come with some security settings activated by default, however there are lot of things you need to do after the initial cPanel installation to have a secure cPanel server. On this post I will explore how to harden cPanel and increase the WHM Security.
Note: this is not a complete cPanel security guide. This is just a basic WHM Security hardening from WHM control panel interface. You should research more to harden your cPanel server from the Linux shell. Or stay tuned because we will release more cPanel Server Security tutorials soon.
Contents
Step by step Hardening cPanel and WHM Security
Let’s start hardening WHM configuration, start hardening WHM following this simple steps.
Set WHM Contact Email Address
Move to WHM » Server Configuration »Basic WebHost Manager ® Setup
Choose your contact email to receive critical information about your system.
Having an email to receive important notifications about your system is one of the first things you must do. It can help you to prevent security issues, as well as to avoid downtime or performance degradation.
Install Munin Monitor
Munin is one of the best server monitoring tools, it allows you to have full stats of your network and system usage, as well as httpd connection tracking. You can integrate multiple plugins to have more control of your system.
Munin is a very useful tool when debugging large attacks over HTTPD that use lot of network usage. It can be installed from WHM interface:
WHM » cPanel » Manage Plugins » Click on ‘Munin‘
Then you can access your Munin stats (once generated, you will have to wait a few hours to see something) from WHM – Munin Service Monitor.
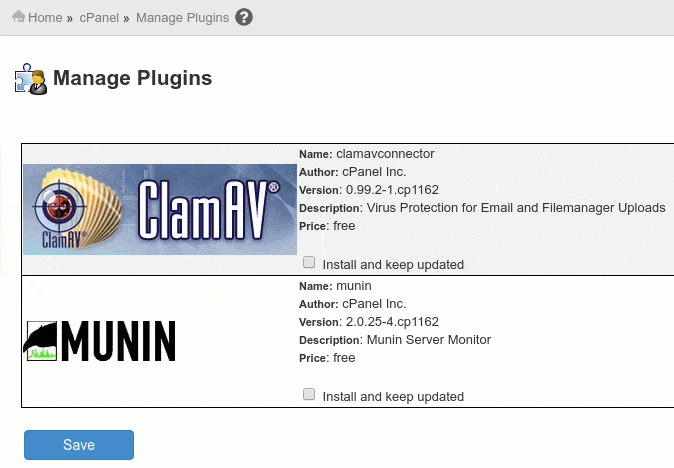
Install ClamAV Antivirus
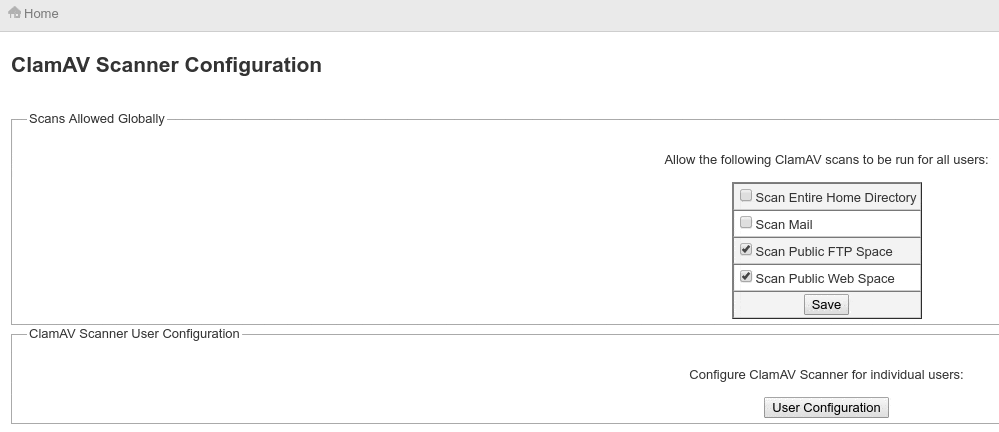
Move to WHM » cPanel » Manage Plugins » Click on ‘ClamAV Connector‘
Now configure ClamAV Scanner to scan your FTP public space, or the mail directories. My suggestion is to scan only your public_html space to avoid using extra resources.
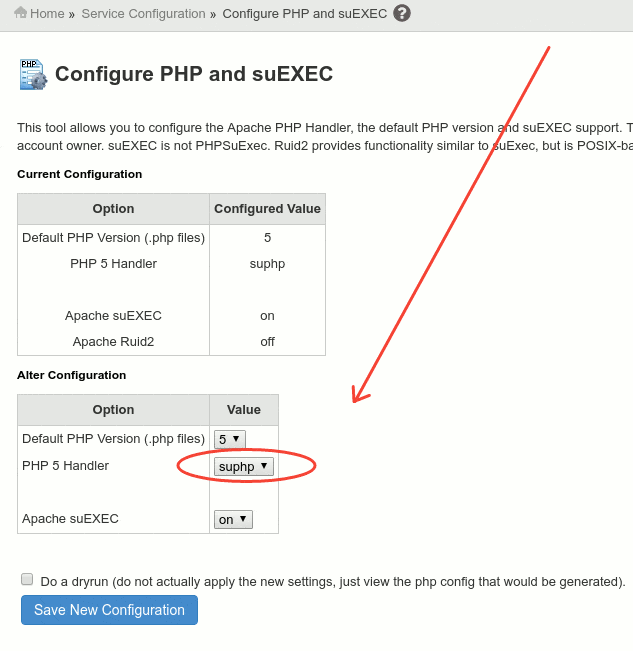
Set suPHP as your default PHP Handler
suPHP is the safest way to run PHP scripts in your cPanel server. suPHP runs php scripts under the same system user as the FTP user, and it does not allow to run scripts with more than 755 permissions, unlike DSO handler that allows 777 permissions, suPHP increases your server security when working with writable directories by restricting max permissions to 755.
suPHP comes enabled by default, but just to be sure, move to:
WHM » Service Configuration » Configure PHP and suEXEC
If you are just moving to suPHP, read this useful post: Migrate DSO to suPHP on cPanel
Tweak Settings Security Configuration
Follow the next steps to harden your ‘tweak settings’ configuration to increase your WHM and cPanel services security. Move to:
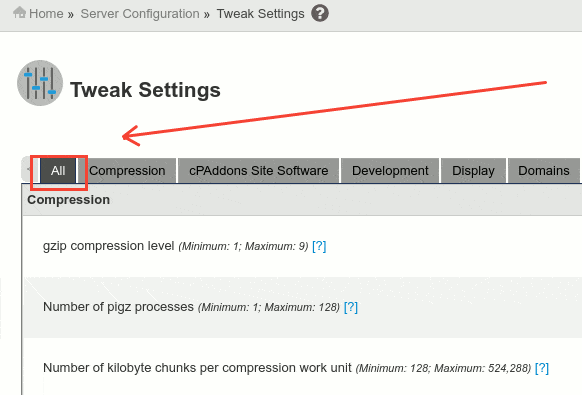
WHM » Server Configuration » Tweak Settings
From the ‘All’ tab, let’s configure the next settings as you see below:
Disable unnecessary stats programs
- Enable Analog Stats – Off
- Enable Awstats stats – Off
Email Security Tweaking
- Enable DKIM on domains for newly created accounts – On
- Enable SPF on domains for newly created accounts – On
- BoxTrapper Spam Trap – Off
- Initial default/catch-all forwarder destination – Fail
- Track email origin via X-Source email headers – On
- Enable Apache SpamAssassin™ spam filter – On
Disable old buggy horde
- Enable Horde Webmail – Off
Enable System Notifications
- System disk space usage warnings – On
- Enable mailbox usage warnings – On
- Send bandwidth limit notification emails – On
Disable unnecessary CGI stuff
- CGIEmail and CGIEch – Off
Enfoce cPanel//WHM/Webmail SSL usage
- Always redirect to SSL – On
- Require SSL – On
Extra Security Checks
- Blank referrer safety check – On
- Referrer safety check – On
Misc Security Settings
- Use cPanel jailshell by default – On
- Include password in the raw log download link in cPanel (via FTP) – Off
Limit Server Status Allowed IPs
- Allow server-info and server-status – 111.111.111.111
This will enable Apache server-status only for your IP, replace 111.111.111.111 with your real static public IP from your local network.
Prevent Spam – Abuse Issues
- Max hourly emails per domain – 200
- The percentage of email messages (above the account’s hourly maximum) to queue and retry for delivery – 100
- Count mailman deliveries towards a domain’s Max hourly emails -On
- Maximum percentage of failed or deferred messages a domain may send per hour – 35%
- Prevent “nobody” from sending mail – On
- Allow users to relay mail if they use an IP address through which someone has validated an IMAP or POP3 login within the last hour (Pop-before-SMTP) – Off
- Add X-PopBeforeSMTP header for mail sent via POP-before-SMTP – Off
- Prefix “mail.” onto Mailman URLs – On
Save your changes.
WHM Security Center
cPanel comes by default with some really good tools to increase your server security, but (I still don’t know why) they all come disabled by default.

Let’s increase WHM Security, move to Security Settings and set this directives as you see below:
WHM » Security Center
- Apache mod_userdir Tweak – On
- Compiler Access – Off
- PHP open_basedir Tweak – On
- Shell Fork Bomb Protection – On
- Traceroute Enable/Disable – Disable
- Shell Fork Bomb Protection – Enable
- Two factor authentication – Enable
Define Password Strenght Configuration
Having strong passwords for your web based services, as well as for cPanel accounts is one of the best ways to prevent cPanel intrusions
Set your password strenght to something equal or higher than 65, move to:
WHM » Security Center » Password Strength Configuration
- Default Required Password Strength – 65
- Check ‘Default’ on all the available options.
Enable cPHulk Brute Force Protection
cPHulk is cPanel’s Brute Force Protection service. It helps to mitigate and block username and ip based attacks. It can be enabled from the following place:
WHM » Security Center » cPHulk Brute Force Protection
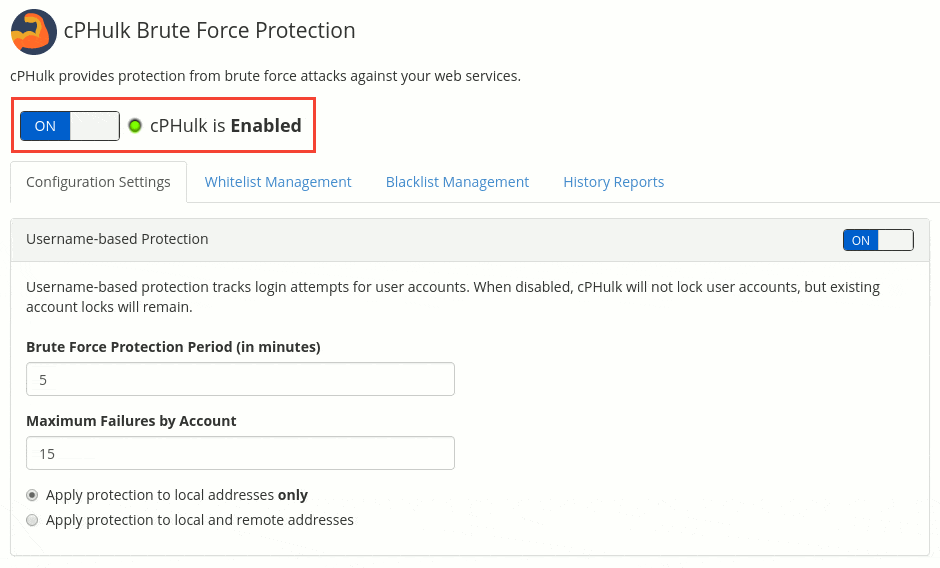
Username-based protection mode tracks login attempts for user accounts. When disabled, cPHulk will not lock user accounts, but existing account locks will remain. You can configure username-based protection by using this options:
- Brute Force Protection Period (in minutes)
- Maximum Failures by Account
IP Address-based Protection helps you to get extra protection from specifi IP addresses. If disabled cPHulk will not block IP addresses. It allows a few tweaks to match your needs, for example:
- IP Address-based Brute Force Protection Period (in minutes)
- Maximum Failures per IP Address
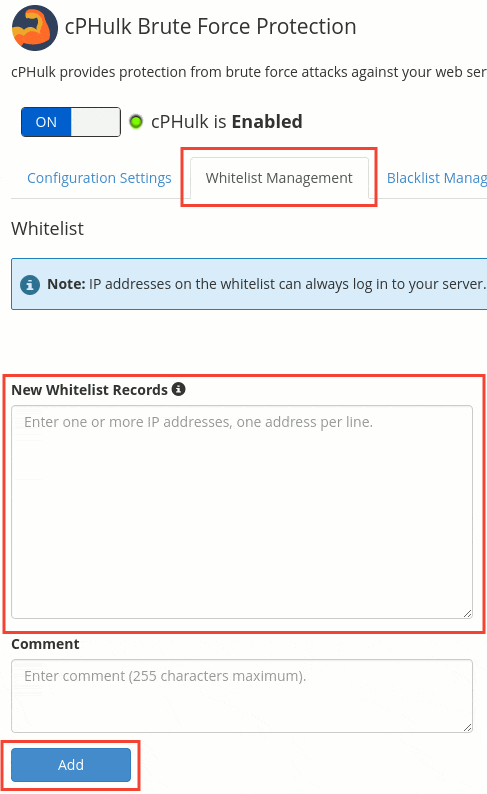
You can also whitelist your office IPs or trusted network IPs to avoid unnecessary blocks over legitimate known users. This can be done from the ‘Whitelist Management’ tab, as you see below:
Configure Host Access Control
Host Access Control allow server administrators to setup allow/deny rules to specific system services based on their IP address. It is based on the popular Tcpwrappers defined from the command line by editing files /etc/hosts.allow and /etc/hosts.deny
The best is to allow only trusted IPs on specific services, and then close the rest of the connections, this increases your WHM security to avoid brute force attacks over specific ports like SSH or FTP.
Host Access Control can be configured from: WHM » Security Center » Host Access Control
To set up an allow or deny rule, you will need to define three settings:
- The service you wish to create the rule for.
- IP address that will be affected
- The action: allow or deny
Eg, in order to block SSH access to everybody, except for your local office IP 111.111.111.111, you must place this rule:
Daemon Access List Action Comment
sshd 111.111.111.111 allow #Allow local SSH access
sshd ALL deny #Deny access from all other IPs
If you use your cPanel Server for shared hosting, you can’t block FTP, Exim, cPanel, Webmail and WHM access, otherwise your users will hate you, for this you must allow all connections for this services, as you see in the screenshot below:
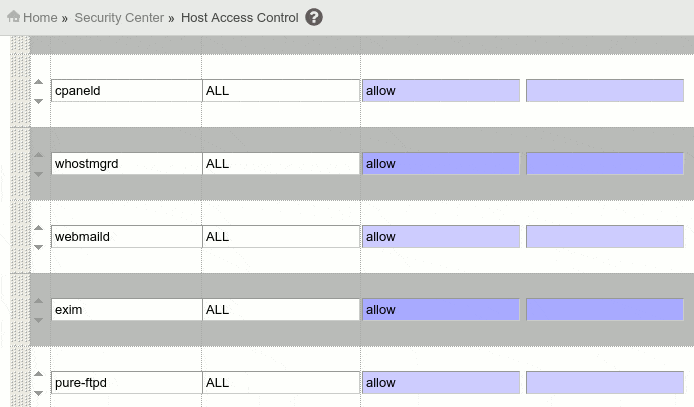
Once you are done editing the rules, just hit ‘Save Hosts Access List’ button.
Enable Background Process Killer
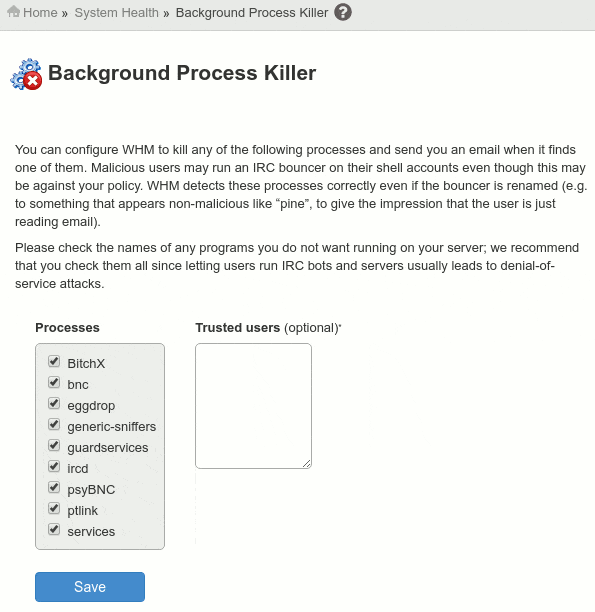
Background Process Killer allows you to select process that if found, the cPanel system will terminate after the daily maintenance scripts run (/scripts/maintenance).
This processes are often used to launch hidden processes, or to launch denial of service attacks (DOS and DDOS) from your server.
Background Process Killer detects this malicious process and automatically kills each one of them, and then it will send you a notification so you can further investigate security issues in your server.
WHM » System Health » Background Process Killer
Suggestion: enable all of them.
- BitchX (command line IRC client)
- bnc (IRC bouncer, used by crackers to hide and launch DOS attacks)
- eggdrop (another popular IRC bot)
- generic-sniffers (crackers use sniffers to analyze data in order to gain access to networks)
- guardservices (another IRC bot)
- ircd (IRC daemon, used often by crackers)
- psyBNC (another IRC bouncer)
- ptlink (another IRC server)
- services (another IRC bot)
Enable SSL for your Hostname
Having your cPanel, WHM and Webmail access encrypted by using an SSL connection on your hostname is really helpful. In order to activate a free SSL for your server hostname you just need to have a FQDN (fully qualified domain name as hostname, eg. server.mysite.com).
As I previously stated in another post: free SSL certificates are here to stay. cPanel will automatically order a free signed certificate when the server runs the upcp maintenance script. Then it will download download and install the certificate when it is available.
If you want to force this SSL for your Hostname, just run this command as root:
/scripts/upcp
Once your SSL is ready, your server will automatically order a replacement free signed certificate. The server will download and install the certificate when it is available.
This will allow you you to encrypt cPanel, WHM and Webmail logins by using this kind of url for your logins:
- https://server.mysite.com:2083/ – for cPanel
- https://server.mysite.com:2087/ – for WHM
- https://server.mysite.com:2096/ – for Webmail
You just need to make sure that SSL usage is enforced as we commented previously by enabling this options from WHM » Tweak Settings:
- Always redirect to SSL – On
- Require SSL – On
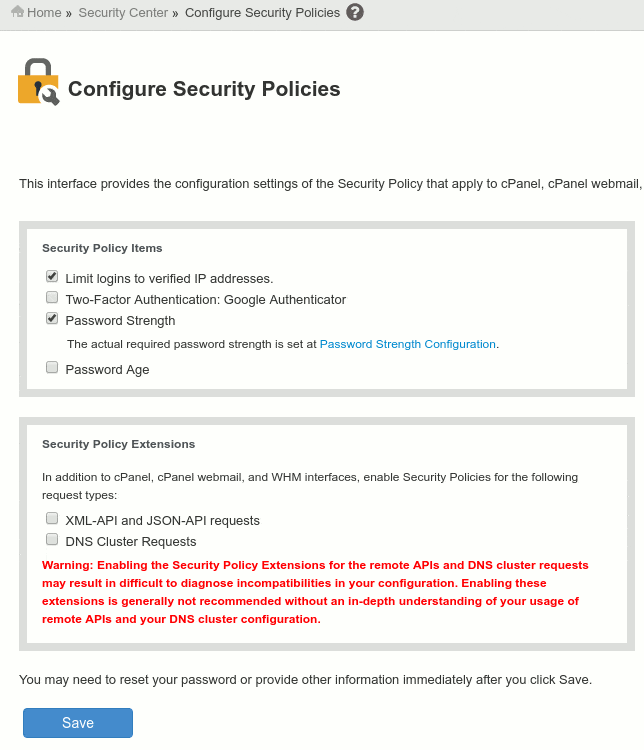
Configure Security Policies
cPanel Security Policies provides a clean interface to manage the security policies for cPanel, Webmail and WHM services on your server.
In order to avoid unnecessary blockings and problems, you should be careful by using this settings. This is the recommended configuration for most servers:
- Limit logins to verified IP addresses – Enabled.
- Password Strenght – Enabled.
Conclusion
WHM Security is just a part of the cPanel Hardening. This tutorial just covers the basic stuff that can be secured from WHM interface. A lot more can be done from the Linux shell by tweaking system services and configurations.
Do you know other ways to harden WHM security settings? Please share your knowledge with us and we will add your security recommendations to this post.
Recommended reading:

I also like the security advisor tool in WHM.